Archive

Blog Archives

PowerApps is definitely one of the coolest tools that we have in our back pockets for extending out Dynamics 365, because it allows non developers to quickly and easily create new apps for Dynamics 365 without doing a lot of coding. It’s almost so easy you will feel like you are cheating.

In this walkthrough we will show you how easy this is by creating a sample application that will allow you to browse customers, orders and order lines directly from a phone, and we can probably do this in about 5 minutes.

Topics Covered

  • Creating your first PowerApp
  • Connecting the PowerApp to your Dynamics 365 data
  • Creating a Customer browser form
  • Adding a Sub Form
  • Filtering the sub form Detail
  • Creating a drill through action from the parent to the child form
  • Adding additional drill through forms

Creating your first PowerApp

The first thing that we need to do is create a new PowerApp using the PowerApp designer.

How to do it…

Start off by opening up the PowerApp desktop app and then click on the New menu item on the left.


This will open up the Create an app form where you can create apps directly from some of the common services. But in this example we will want to create a Blank app. We have two different options here, we can create a Phone layout or a Tablet layout.

We will click in on the Phone layout option.
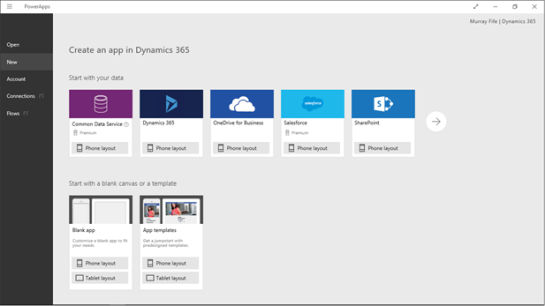

This will open up the PowerApp designer page.

On the left you will see the one page that is automatically created.

In the center is the canvas for the design.

On the right is our configuration panel.

And along the top is the Action/Ribbon bar.


Connecting the PowerApp to your Dynamics 365 data

Now that we have an app to work with we will want to connect it to our data within Dynamics 365.

How to do it…

To do this, switch to the Content action menu and then click on the Data sources button.


On the right hand panel a Data sources option will show up. To connect to the data, click on the Add data source button.


This will then show us a list of different data sources that we can connect to. In this example we will want to click on the Dynamics 365 for Operations connection icon.


This will open up a list of connections to our Dynamics 365 for Operations environments that we can use for the application. All we need to do here is click on the connection.
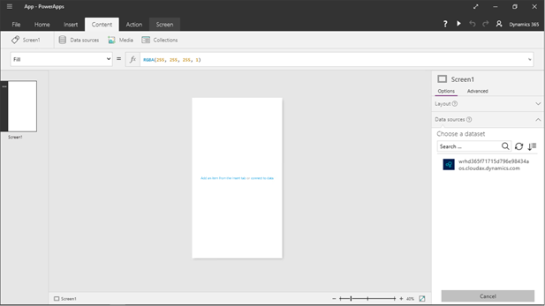

Now PowerApps will interrogate the Dynamics 365 connection for all of the entities that are published for us to use.


For this example, we will type in customers into the filter box.


This will allow us to see the Customers entity and we can check the box to include it in the connection.


Before we finish though, let’s add in a few more table connections. Filter out the list by typing in salesorder into the filter box.


This will allow you to select the SalesOrderHeaders and SalesOrderLines entities that you can select and then click on the Connect button.
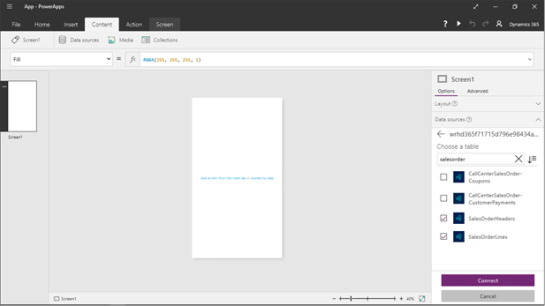

After you have done that you will see that the three data entities are now connected to the PowerApp.


Creating a Customer browser form

Now that we have connected the PowerApp to our data within Dynamics 365 for Operations, let’s start creating a form, and a great place to start is to create a way to browse through the customer data.

How to do it…

To do this we will want to add a control to the form that we can use to view all of the data that we have in the Customers data source. To do this, switch to the Insert action bar and we will see that there are a number of different visual control that we can use.


The form that we want to use here is the Gallery control which gives us a way you browse through multiple records at once. If you click on the Gallery button then you will see that here are a number of different formats for the gallery as well. We will want to select the Vertical Text gallery option.
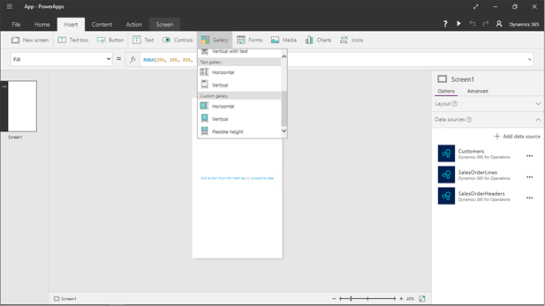

This will add a new control to the page that we created.
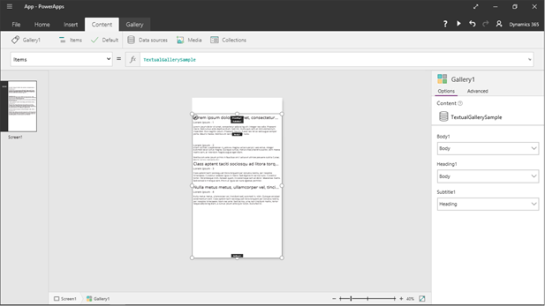

It is connected to dummy data right now, but if we click on the Connection icon on the right hand side and it will show us all of the connections that we added to the app earlier on. Start off by selecting the Customers connection.


This will change the default fields that are connected to the form.
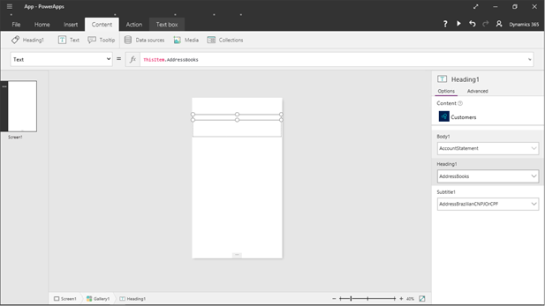

If you click on any of the fields on the right hand panel, you will be able to browse through all of the fields that are available within the connection. In this step we clicked on the Heading1 field and can select the Name field from the Customer connection.
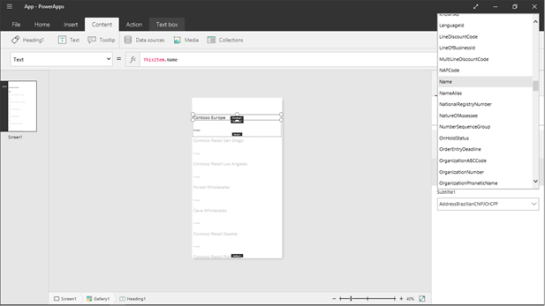

If we click on the Subtitle field we can link that with the CustomerAccount field.
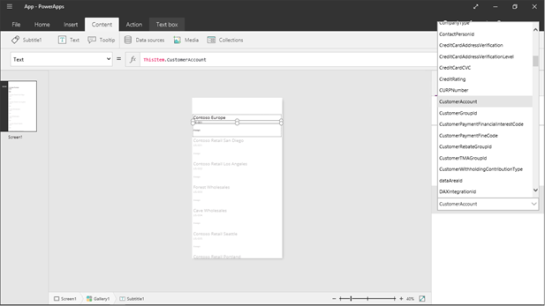

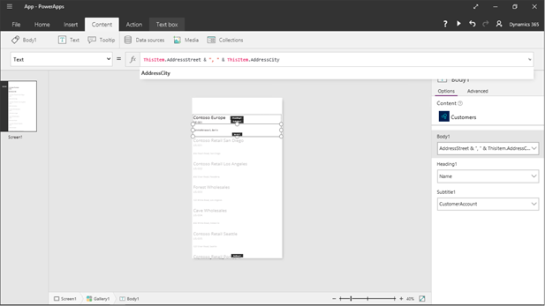
Now select the Body1 field. If you look up in the formula bar, you will notice that there is a formula that links to the fields.
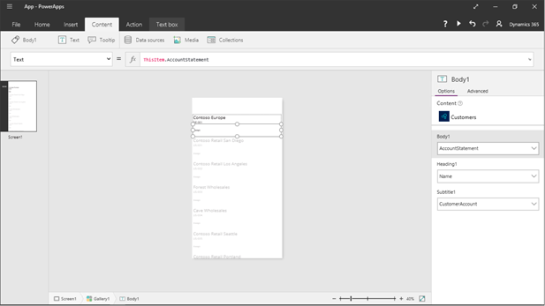

If we want, we can create a function that includes multiple fields. In the formula bar, type in this function to show the Street and City.

ThisItem.AddressStreet & “, ” & ThisItem.AddressCity

If we want to see the form in action, all you need to do is click on the Play button in the form header.

Adding a Sub Form

Now that we have a Customer browser, we will probably want to add a little bit or other functionality. Since we connected the Sales Order Header entity to the data connection, then let’s add a sub form that will show all of the sales order headers.

How to do it…

To do this, we will want to create a new screen by clicking on the New Screen button within the Home action bar.
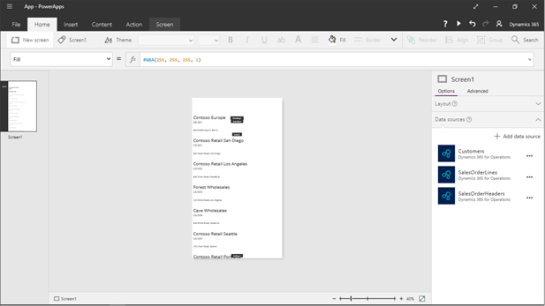

This will create a new blank screen for us. On the right hand side we will see a few sample layouts that we can use to save us some time in adding data galleries.


We can select a simple gallery browser layout and that will automatically add in a few sample controls.


If we click on any of the fields within the form then we will be able to see the fields and also the data connection.


Here we will want to click on the template data connection and change it to the SalesOrderLines data connection.


Now we will be able to click on the Heading2 field dropdown list and then select the SalesOrderNumber field.

Now we see all of the sales orders are listed in the form.


Filtering the sub form Detail

Seeing all of the sales orders is great, but, we only want to see the orders for the customer that we selected in the previous screen. So we will want to filter out the results just to the ones that are associated with the customer.

How to do it…

To do this click on the Function dropdown list on the left, and select the Items function. Within the function detail we can see that this is linked to the SalesOrderHeaders connection.


To do this, change the filter function to this:

Filter(SalesOrderHeaders, OrderingCustomerAccountNumber = Gallery1.Selected.CustomerAccount)

This command filters the SalesOrderHeaders table, just to show the sales orders where the OrderingCustomerAccountNumber matches the CustomerAccount that is selected form the first screen.


Creating a drill through action from the parent to the child form

Now that we have the sub form, we need to do one last thing before we can see all of this working. And that is to create a link from the parent form so that when we click on the record, it takes us to the child form.

How to do it…

To do this, select the field that we want to trigger the drill through on and then select the OnSelect option from the function bar.


Now we just need to change the function to use the Navigate command. So update the function to:

Navigate(Screen2,ScreenTransition.Cover)

This just says to navigate to the second screen that we created.


The next thing you know you will be taken into the sub form, and only see the sales orders associated with the customer account.


Adding additional drill through forms

Since we also included the Sales Order Lines connection into the application, let’s finish off the application by adding a third form that we can drill through into from the Sales Order Headers form to see all of the products on the order.

How to do it…

To do this, just click on the New Screen button to create a new screen and then select the form layout that you want to use for the form. In this example we got a little fancy and used the tiled view.


Then click on the connection link and point it to the SalesOrderLines connection.


Then set the Body2 field to link to the ItemNumber field.


And then change the Footer1 field to show the SalesPrice field.


Then update the Items function to filter out the data that shows to just the lines that are associated with the Sales Order Header form. You can do this by using this function:

Filter(SalesOrderLines,SalesOrderNumber = BrowseGallery1.Selected.SalesOrderNumber)


Then return to the second screen and change the OnSelect function to navigate to the third form by using the following function:

Navigate(Screen3,ScreenTransition.Cover)
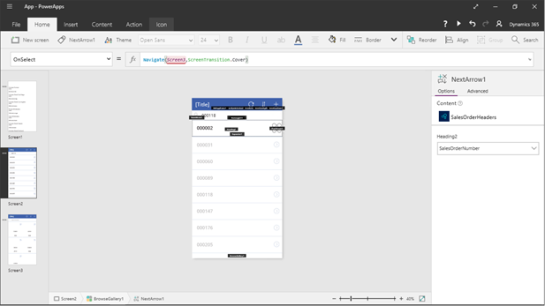

BAM! Now we are seeing the lines as tiles.


Summary

How easy is that. We just created a simple app that browses customers and allows us to see all of the sales orders and lines for the customer as well. Coding this the normal way would take forever, and for this example we created it in just a couple of minutes. All we need to do now is pretty it up a little and add some branding, but that is the fun part.

About the Author

Murray is a Technical Solution Professional at Microsoft and Author of over 25 books on Microsoft Dynamics including the Bare Bones Configuration Guide Series which contains over 15 books that show novice users host to set up Microsoft Dynamics using visual walkthroughs. These guides start off with the Financial modules of Microsoft Dynamics and then progress through the Operational, Distribution, and then the more specialized modules like production, service management, and project accounting. You can find all of his books here on Amazon http://www.amazon.com/author/murrayfife.

Throughout his 30+ years of experience in the software industry he has worked in many different roles, including as a developer, an implementation consultant, a trainer and a demo guy within the partner channel which gives me a great understanding of the requirements from both customers and partners perspective.

Here is all of his contact information:

Email: murray@murrayfife.com
Twitter: @murrayfife
Facebook: facebook.com/murraycfife
Google: google.com/+murrayfife
LinkedIn: linkedin.com/in/murrayfife

Blog: atinkerersnotebook.com
Docs: docs.com/atinkerersnotebook
Amazon: amazon.com/author/murrayfife


Branding Dynamics 365 is something to give the system a little more of a personalized experience for the organization that we are working with, but we can take this one step further if we want by branding the login landing page that we always need to use to get access to the system.

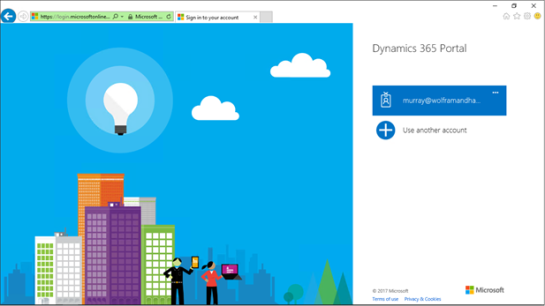
For example, although colorful, the default login page for Dynamics 365 looks a little generic.

In this walkthrough we will show you how you can do this. All you need is make a couple of tweaks to the Azure Active Directory settings.


How to do it…

To do this, open up your Microsoft Azure portal for your tenant by browsing to https://azure.microsoft.com.

When you get there, click on the My Account link in the header of the page.


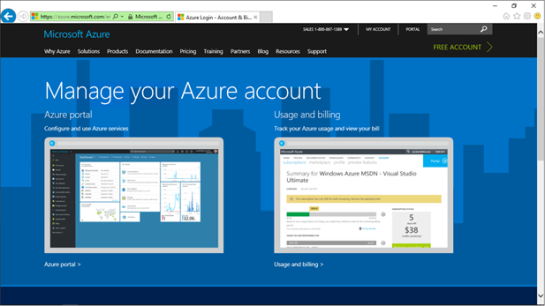
This will take you to the Manage your Azure account page, and from here we will want to click on the Azure portal link.


After you authenticate into Azure you will be taken into the Microsoft Azure Dashboard. Look on the left hand menu and select the Azure Active Directory item.


This will take you to an area where you can manage all of the different options for Azure Active Directory. The option that we are interested in looking at here is the Company branding options, so click on the Company branding link in the left hand menu.


When the Company branding page is displayed, just click on the Edit company branding link.

Note: The first time that you access this feature you may need to do a little bit of initial configuration and step through a wizard.


This will open up all of the Company branding options for us.

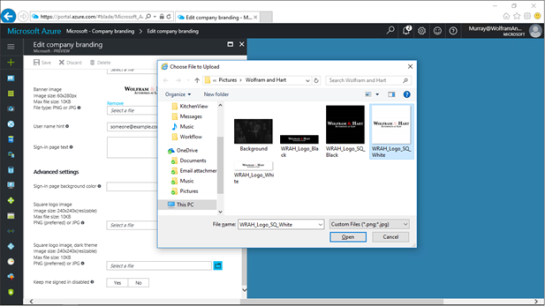
To start off, we can update the login page background image. To do that, just click on the folder icon to the right of the Sign-in page image field.


This will open up a file explorer and we can then select the background image that we want to use and then click on the Open button.


When we return to the Edit company branding form, the only step that is left for us to do is to click on the Save button in the header.


Then we will get a notification that the branding has been applied.


How it works…

To see this in action, we just need to log into Dynamics 365.

Initially, since we have not selected a domain, our login page will show the default background image.


But as soon as we either select, or type in a username that is connected to our domain, the background image that we uploaded will show up.

How cool is that?

But let’s not stop there. There is additional branding that we can perform that allows us to add a smaller branded logo in the login area where it is currently just saying Dynamics 365 Portal.


How to do it…

To do this, return back to the Azure Active Directory Company branding form. There are three more branding components that we can update including a banner image, and also a square logo image.

Start off by clicking on the Banner image file folder icon.


This will open up a File explorer and we will be able to select a small banner image and then click on the Open button.

Note: Pay attention to the size of this image – the recommended size is 60x280px, and also for some images you may need to take down the image depth so that it is led than 10KB.


After you have done that you should be able to see the new Banner image is showing on the form, and you can save the changes if you like.

Now click on the Square logo image file folder icon.


This will allow you to select a square logo image for the company branding.

Note: This is the light background version, so if you don’t want it to stand out too much, then you may want to use a white background for this image. Again, pay attention to the size of this image – the recommended size is 240x240px, and also for some images you may need to take down the image depth so that it is led than 10KB.

After selecting the image, click on the Open button.


After you have done that you should be able to see the new Square logo image is showing on the form.

Now click on the Square logo image, dark theme file folder icon.


This will allow you to select a square logo image for the company branding.

Note: This is the dark background version, you may want to use a dark, or black background for this image. And remember, pay attention to the size of this image – the recommended size is 240x240px, and also for some images you may need to take down the image depth so that it is led than 10KB.

After selecting the image, click on the Open button.


Now, all that is left is to click on the Save icon and save the changes.


How it works…

Now when you log into your organization, the smaller logo will show up as well.

This is useful for logins on smaller form factor devices like smart phones, because the background image will not be shown, but the logo image will.


Review

Branding the Azure Active Directory login page is a great way to add that extra little bit of personalization to your environment and also gives people something to look at each time you log into your environment.

And it only takes a couple of minutes to do which is a bonus.

About the Author

Murray is a Technical Solution Professional at Microsoft and Author of over 25 books on Microsoft Dynamics including the Bare Bones Configuration Guide Series which contains over 15 books that show novice users host to set up Microsoft Dynamics using visual walkthroughs. These guides start off with the Financial modules of Microsoft Dynamics and then progress through the Operational, Distribution, and then the more specialized modules like production, service management, and project accounting. You can find all of his books here on Amazon http://www.amazon.com/author/murrayfife.

Throughout his 30+ years of experience in the software industry he has worked in many different roles, including as a developer, an implementation consultant, a trainer and a demo guy within the partner channel which gives me a great understanding of the requirements from both customers and partners perspective.

Here is all of his contact information:

Email: murray@murrayfife.com
Twitter: @murrayfife
Facebook: facebook.com/murraycfife
Google: google.com/+murrayfife
LinkedIn: linkedin.com/in/murrayfife

Blog: atinkerersnotebook.com
Docs: docs.com/atinkerersnotebook
Amazon: amazon.com/author/murrayfife

With the Update 2 release of Dynamics, a new preview feature was made available within the product that allows you to create mobile applications for Dynamics directly through the application itself.

These mobile workspaces and forms will run in connected mode, will cache information and run in a disconnected mode, and also allow you to update data within Dynamics when connected, or disconnected as well (the disconnected updates occur when you regain your internet connection).

Although this feature has not been officially released, we can take a look at what it does right now and see how it works.

Enabling the Mobile Options

The first thing that we need to do is to enable the feature so that we can start seeing all of the mobile options that are available to us.

In order to do this, just add the following parameter to the end of the Dynamics URL:

&mode=mobile


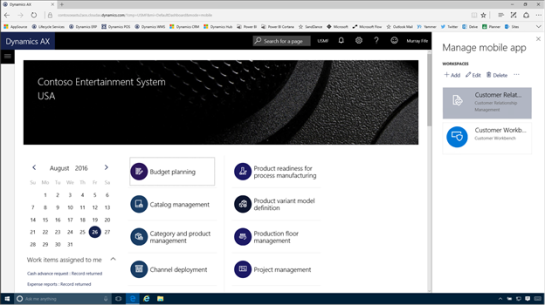
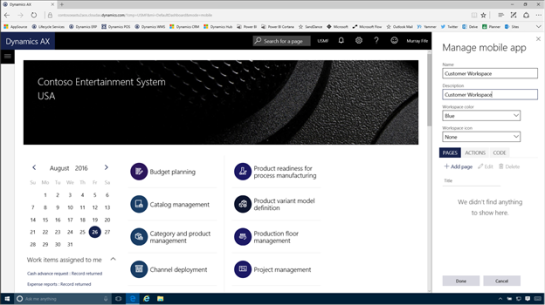
This will add a new Mobile app option to the options menu.


If you click on the menu item, then a panel will show up on the right hand side that will allow you to start editing and creating new workspaces.


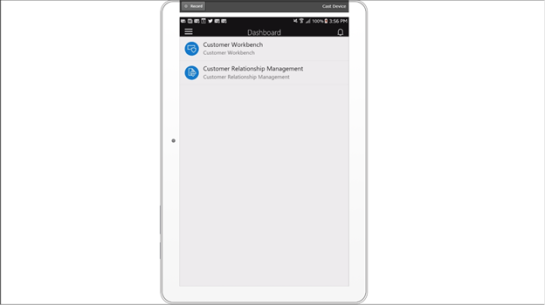
The second part of this feature is the mobile app itself. This is just another client for Dynamics and will run on Android, iOS, and I assume the Windows platform as well.

Luckily I have got a pre-release version so that we can see it in action.

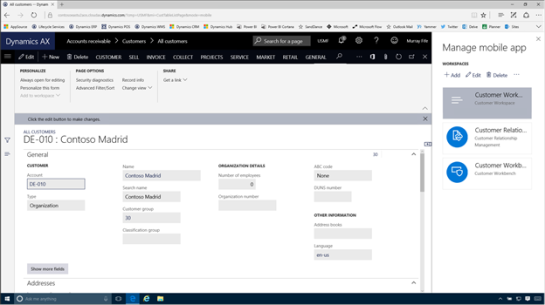
Notice that the workspaces that were in the Dynamics Mobile manager form show up here as well.


Creating a new Mobile App

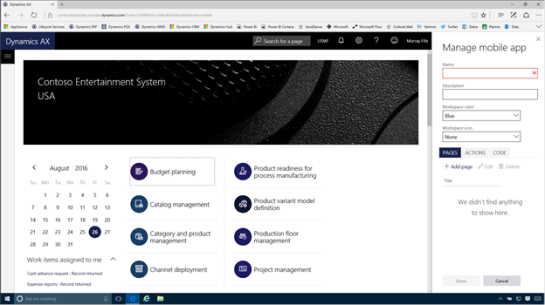
To create a mobile app, all we need to do is click on the + Add button within the Manage mobile app panel.


This will open up another screen where you will be able to define the main workspace for the app – which is the icon that shows up on the mobile device.


All we do here is enter in a Name and a Description.

If we want to we can also select a Workspace icon from the default icon list, and even the Workspace color.


Creating a Mobile App Page

Now that we have defined our app we can start adding pages to the app. To do this, just click on the Add page button.


This will open up a new page screen.


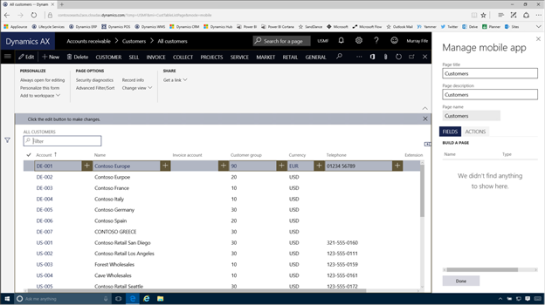
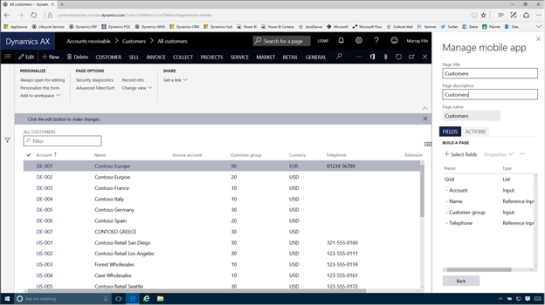
Enter in the Page title and the Page description.


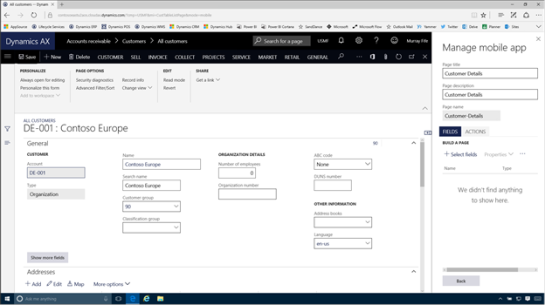
Next we will want to select the fields that we want to show on the page. Before we do that though we will want to navigate to the form within Dynamics AX that we will be using as the template. In this case we are in the Customers form.

Once we have done that, just click on the + Select fields button.


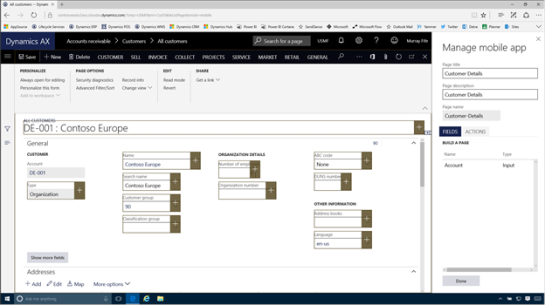
This will turn on selection buttons within all of the fields that we are able to add to the form.


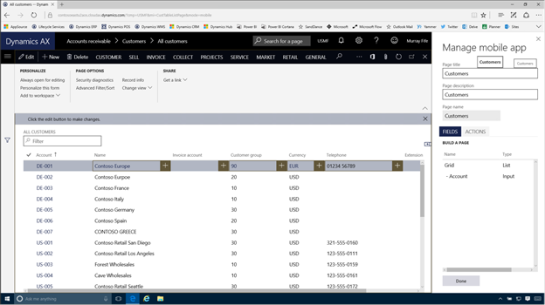
If we click on one (like the Account) then it will be added to the list of fields for the form.


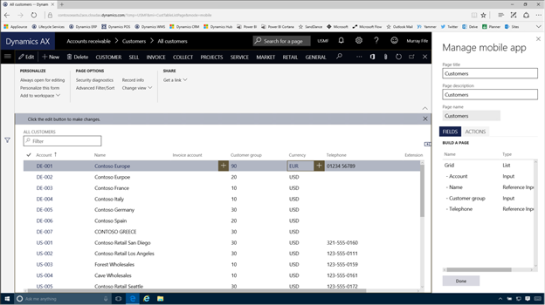
We can continue adding fields until we are ready to move on. When we are finished, just click on the Done button.


This will return the form back to its normal state. To finish the form we just want to click on the Back button.


This will return us to the workspace form and we can see that our page has been added.


Adding a Detail Page

The app is pretty good right now, we will be able to scroll through all of the customers. But to make the app even better we will want to add a drill through page for the records that we show so that we can see even more information.

To do this we just need to select the main page that we just created and click on the Edit button.


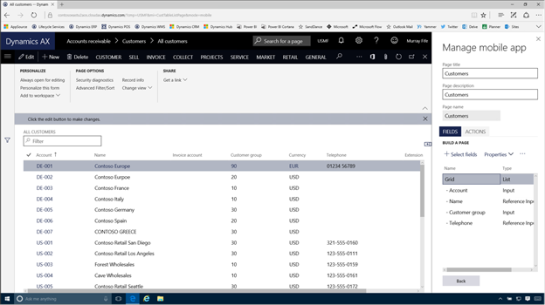
This will return us to the details of the page, and if we select the Grid entry in the list of fields we will see that the Properties button becomes enabled.


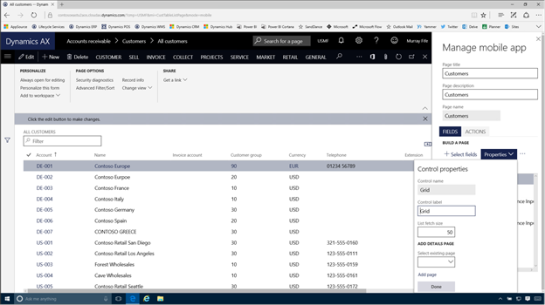
If we click on the Properties button then a few more options will show up. We are interested in the Add Detail Page option here. We don’t have a page already built so we just need to click on the Add page link at the bottom pf the panel.


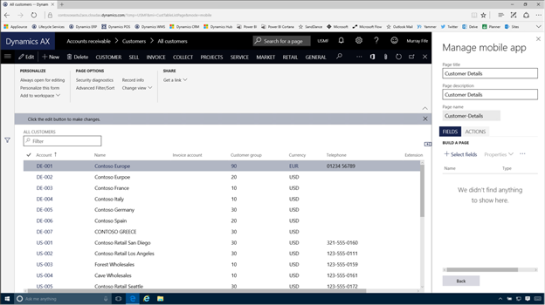
This will open up a new Page definition for us.


We just need to give the details page a Page name and a Page description.


Before we start selecting fields though let’s drill into a details page for the record so that we have more to work with and then click on the Select fields button.


Now we will see that all of the fields on the details form have the +option that allows us to add them to the mobile app.


All we need to do is click on one and it will be added to the list of fields.


We can add as many fields as we like and when we are done, just click on the Done button.


Adding a new Action

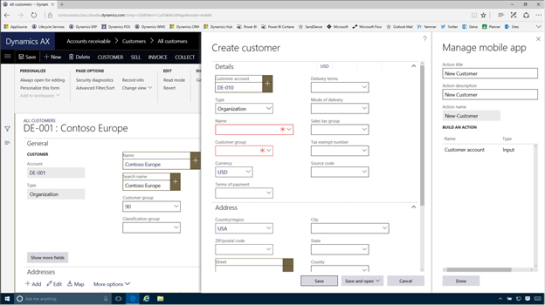
There is one last thing that we will want to do here, and that is to create an Action. Actions are things that do something, like adding a new record, deleting a record, etc. We can add these to the pages by stepping through them and the system will record our actions and clicks and build a script in the background for us.

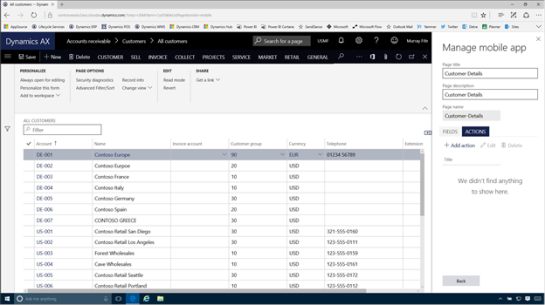
To do this click on the Actions tab and then click on the + Add Action button.


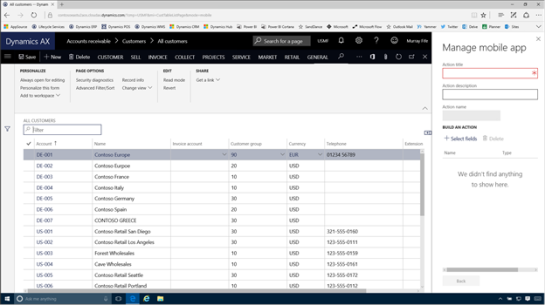
This will open up an Action definition page.


Just enter in an Action name and an Action Description.

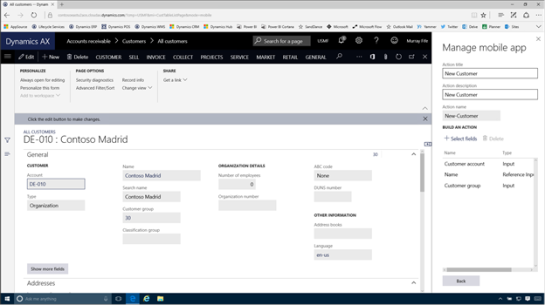
Then click on the + Select Fields button which will switch you into the record mode and we can start teaching Dynamics the action.

In this example we just click on the New button in the menu bar to create a new Customer.


Then we step through the process as if we were doing it in real life.


As we move from field to field we will see that the fields we update get added to the list of actions.


After updating all of the required fields we can click on the Save button for the customer.


This will return us back to normal edit mode within the mobile app and the action has been recorded for us.

Now we can just click on the back button to exit the action.


When we return to the detail page, just click on the Back button again.


This will take us back to the workspace and we can now click on the Done button.


Publishing the Workspace

Now that we have created the workspace we will be given an option to publish the workspace. To do it just click on the Publish workspace link.


Now when we return back to the main page we will see that we now have a new application that the users will be able to use.


How it works…

To see this in action, we can return back to the mobile app and we will see that we still don’t have the new workspace that we created.


All we need to do is pull down the form a little and let go to start the refresh back to the server.


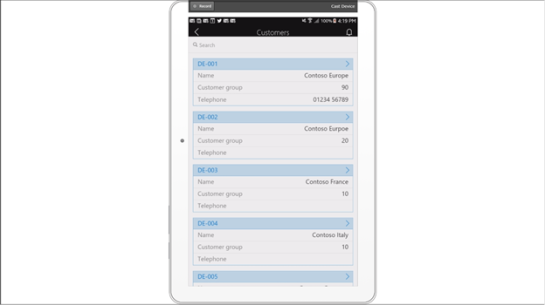
Within a second or two we will see that we now have a new workspace that we can click on.


When we go into the workspace we will see the main page that we created, and we can click on it.


This will take us into the list page that we created, and because we have defined a detail page, we can also drill into the records by clicking on the > button.


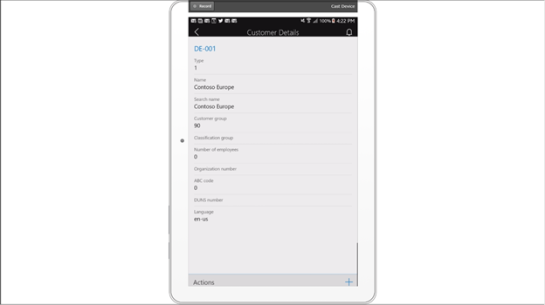
Now we are in the detail form and we can see more fields. Notice down the bottom of the form though there is an Actions option. This shows up because we associated an action with this form when we designed it.


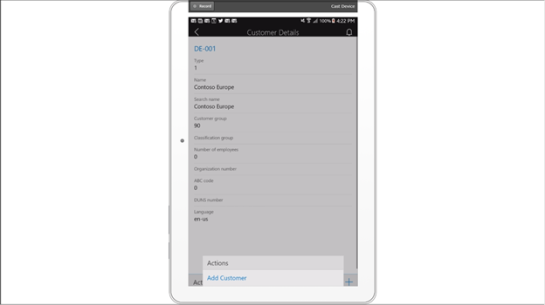
If we click on the Actions button it will show us the action that we defined earlier.


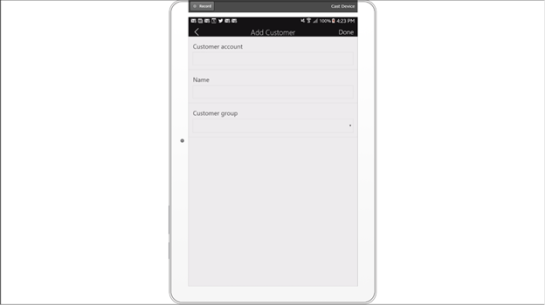
If we click on it we will be taken into the Add Customer page.


We can start updating the fields just like we would have within Dynamics.


Also notice that the dropdown boxes show us the valid values as well.


When we are done, just click on the Done button.


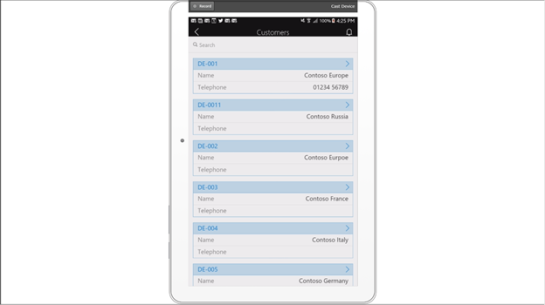
When we return back to the list page on the mobile app we will see that we now have a new record.


Also, when we return back to Dynamics we will see that there is a new record in there as well – which makes sense because the Mobile app is just another way of updating Dynamics.


Review

This new feature enables us to turn pretty much any form within Dynamics into a mobile form, without refactoring any of the base code, and also without writing a single line of code.

If you ask me, that is pretty darn cool.

About the Author

Murray Fife is a Technical Solution Professional at Microsoft and an Author of over 25 books on Microsoft Dynamics AX including the Bare Bones Configuration Guide series of over 15 books which step the user through the setup of initial Dynamics AX instance, then through the Financial modules and then through the configuration of the more specialized modules like production, service management, and project accounting. You can find all of his books on Amazon at http://www.amazon.com/author/murrayfife.

Murray is also the curator of the Dynamics AX Companions (www.dynamicsaxcompanions.com) site which he built from the ground up as a resource for all of the Dynamics AX community where you can find walkthroughs and blueprints that he created since first being introduced to the Dynamics AX product.

Throughout his 25+ years of experience in the software industry he has worked in many different roles during his career, including as a developer, an implementation consultant, a trainer and a demo guy within the partner channel which gives him a great understanding of the requirements for both customers and partner’s perspective.

For more information on Murray, here is his contact information:

Email:   mufife@microsoft.com
Twitter:   @murrayfife
Facebook:   facebook.com/murraycfife
Google:   google.com/+murrayfife
LinkedIn:   linkedin.com/in/murrayfife
Blog:   atinkerersnotebook.com
Docs:   docs.com/mufife
Amazon:   amazon.com/author/murrayfife


Creating mobile apps for Dynamics has never been an easy task in the past because they have always required developers and a lot of coding. And then having to integrate the app that you create is another story, requiring even more coding and developers. Creating a mobile app has not been something that you normally want to take on unless there is a huge need, and usually a hefty budget.

But, with the introduction of the PowerApps platform that changes a little. Now we can create mobile apps that use a new feature called the Common Data Model by using the PowerApps designer, and then trigger updates to Dynamics through another new tool called Flow. All of this is possible with just a little bit of work, and also no development or coders required.

In this walkthrough we will show how you can do this without breaking a sweat.

Accessing the Contact Table in the Common Data Model

In order to create an application we need to have somewhere to store all of the data. For this example we will use the Common Data Model Entities as the staging area for our contacts and then have them trigger events to update the data within the other subsystems of Dynamics.

To see all of the tables (including the Contact table) all we need to do is open up the PowerApps portal, and then click on the Entities link in the menu bar.


This will open up a list of all the entities that are available. In this case, these are all of the entities that are created when the Common Data Model database was created for us.


If we drill into the Contacts entity then we will be able to see all of the standard fields that are available for us to use within our applications.

In the top right hand corner is a link that allows us to Open in Excel.


If we click on that it will open up the table in Excel and allow us to maintain the data that is in there, and also see as new records are created. We will leave this open for now because it will allow us to see the data records as we create them in the next step.


Creating Our Registration PowerApp

Now we will start creating our PowerApp mobile application. For this example we will use the PowerApps desktop version which we downloaded from the Microsoft Store.

All we need to do to start creating our app is to click on the Phone Layout link within the Blank app section of the Create an app group.


This will open up the PowerApps canvas where we can start building our application.


Rename the first screen

The initial application will only have one screen that we will start configuring. Later on we will add another screen that we will call from here, but before we do that, let’s make a quick change.

If we select the Screen1 page, and then look within the Home ribbon bar, we will see a button there with the same name. If we click on this button, a rename option will show up and we can change the name from the default name to something a little more useful. In this case we will set it to Welcome for the Welcome screen.


Adding a Connection to the Common Data Model Entity

The next thing that we will want to do is to connect the application to the table within the Common Data Model. To do this all we need to do is click on the Content ribbon bar and we will see that there are a couple of options available for us.

In this example we will want to click on the Data sources button.


This will open up a panel on the right where we will define all of the data sources that we want to use in this application.

To add a data source, all we need to do is click on the Add data source button.


This will open up a number of different data source options for us. The one that we are interested in this example though is the one that is linked to our Common Data Source (the second one down in the list). All we need to do is click on it.


Then we will be asked which Common Data Model that we want to use. In this case we have a couple of different models, but I want to connect to the My database.


This will then open up all of the Entities that are available for us to connect to our application. Here we will want to select the Contact entity and then click on the Connect button.


Now we have a data source that we can use in our application.


Creating additional Pages

For this application we are going to start with a Welcome page with a link that then allows people to create new records within the Common Data Model entities. So the next step in the process is to add a second screen. To do this, click on the Insert ribbon bar, and then click on the New Screen button.


This will create a second screen for us.


We will change the name of the new screen from the default name to Signup.


Adding a Editable registration form

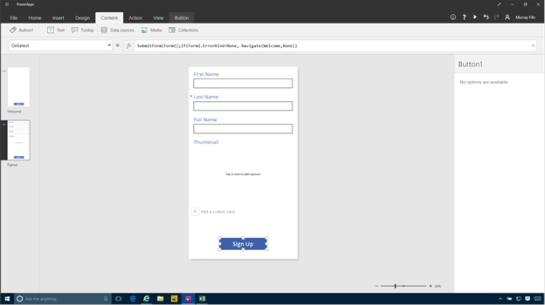
Now we will want to add a way for the users to add records into the table. To do this we will want to click on the Forms button within the Insert ribbon bar and then click on the Edit button.


This will add a new form onto the page. But it is not connected to any data source yet. To fix that, click on the No data source selected link on the right and we will see that our Contact data source is available for us to select from. Let’s do that.


After selecting the data source we will see all of the fields that we can add to our form. Right now none are selected though.


All we need to do is click on the eye icon beside the field to toggle them from hidden to visible.

Here we added the following fields:

First Name

Last Name

Full Name

Thumbnail

This will allow us to get our recruit details and also a picture for reference.


Adding some navigation buttons

Now that we have created our edit form, we will want to add some buttons to control the navigation within the form.

We will start off by adding a button to submit the sign up details for the form. To do this we just click on the Button button within the Insert ribbon bar.


This will add a new button to the Signup form.


We will want to change the name of the button a little. To do that we just double click on the button and then we can edit the text and change it to Sign Up.


We will also want a button on the welcome page to click in order to open the record details page. So we can just copy the button from the Signup page and paste it into the Welcome page.


Creating a New Record action

Now we will want to make our button do something. If we click on the button, then we will notice that the events will show up as a dropdown list underneath the ribbon bar. We will want to select the OnSelect event to create an action whenever the button is clicked.

Now we want to say what the action is that we want to perform. Within the fx field type in:

NewForm(Form1)

This says that when we click on the button, create a new record in Form1, which is our edit form within the Signup page.


But we don’t want to stop there. We need to also switch pages and navigate to the Signup page for someone to enter in their details. So we will add the following to the end of the function:

;Navigate(Signup,ScreenTransition.None)

This tells the system to navigate to the Signup screen and then have no transition effects.

Also. note the ; which separates the two commands.

The final command should look something like:

NewForm(Form1);Navigate(Signup,ScreenTransition.None)


Creating a Save Record action

Now we will want to create an action that allows the users to save their signup information after they have filled out the form. To do this we will swap to the Signup form, select the Signup button and then select the OnSelect action.


For this action we will want to submit the form to the database. So within the fx editor start by adding the following command:

SubmitForm(Form1)

This will submit whatever is in the form to the Common Data Model.


We are not quite finished though. If there are no errors in the form then we will want to return back to the welcome screen. So we will want to add the following action:

;If(Form1.ErrorKind=ErrorKind.None, Navigate(Welcome,ScreenTransition.None)

This tells the system to check for an error and if there isn’t one then return back to the welcome screen.

The full action is:

SubmitForm(Form1);If(Form1.ErrorKind=ErrorKind.None, Navigate(Welcome,ScreenTransition.None)


Taking the form for a test drive

Now that we have created our application we can take it for a spin. To do this, click on the Welcome form and then click on the Play icon in the menu bar in the top right hand corner of the designer.


This will open up the form as if it were a real app, and we will be on the Welcome screen with the sign up button. All we need to do is click on it.


This will open up the Sign up form and we can fill in all of our details and add a picture before clicking on the Sign Up button to submit the record to the common data model entity.


If everything goes well then we return back to the main form.


If we return to our Excel file that is linked to the Contacts entity and click on the Refresh button we will see that a new record has been added to the form.


Embelishing the PowerApp Forms

The application that we just created is pretty functional as it is and would work perfectly well out in the field, but it is a little boring. So we will want to embellish the form a little. The first thing that we will do is add a background image to the form.

To do this we will select the page and then click on the Screen ribbon bar. Then click on the Background button and select the Add an image file option.


This will add open up the file explorer and we can select a background that we want to use on the form.


Then we can change the background fill to make it match the image.


Finally we will change the button to make it look less like a button by removing the border and fill and then changing the font a little.


Then we repeat the process for the Sign Up form, and make sure that all o the labels look nice.


Creating a Flow to update Dynamics

Now that we have our recruitment form all set up and are capturing the information within the Common Data Model Entity we will want to start doing things with it. To do this we will take advantage of Flow which will watch for information changing within the entities and then allow us to update other systems including Dynamics.

To do this we will open up Flow and then click on the Create from blank button.


This will create a new Flow template for us, and the first thing we need to do is select the event that we want to use to trigger the flow. If we click on the search field then we will see that there are a number of different options including the Common Data Model – When an object is created trigger.


After we have selected that trigger then we will see a couple of configuration fields that we need to specify.


When we click on the Namespace option we will be able to select the Common Data Model database that we want to watch.


And then we can select the Entity that we want to watch, which in this case is the Contact entity.


Adding a new Action to create a Contact in Dynamics

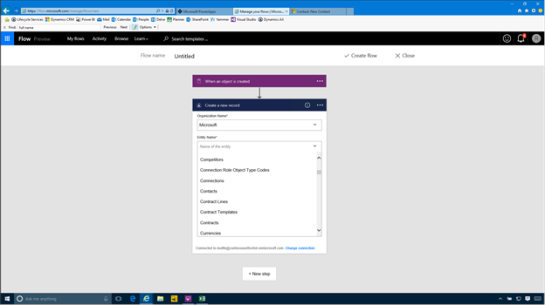
After we have done that we can click on the New Step button and then select the Add Action button to add a new cation that gets performed when a new contact is added.


When the search box is displayed we can search through all of the actions that are available to us. These are different from the triggers and we can scroll down and find the Dynamics CRM Online – Create a new Record option.


Now we need to link the action to our CRM instance.


If we click on the Organization Name dropdown we will see that our CRM instance is available to us.


And then we can click on the Entity Name dropdown and select the Contacts entity from CRM.


This will then show us some more fields to update.


When we click on the Last Name field we will see all of the fields that are available for us to put in the field.


Just click on the Last Name field from the Common Data Model entity and it will be added to the field.


If we click on the Show Advanced Options button we will see that there are more fields that we can update.


Here we updated the First Name as well.


Adding an Action to create a Lead in Dynamics

Additionally we added another step that we want to perform when the contact is created, and that is to create a Lead. We went through the same process as we did with the Contact, except we just select the Lead entity type from CRM.


Publishing the Flow

After we have done that we can publish the Flow and start it running in the background. To do this we start off by giving our Flow a Flow Name and then click on the Create Flow button.


That will save the Flow away for us and then we can close out of the page.


When we return back to our list of Flows we will see that we have a new flow process registered.


Testing out the Flow automation

Now that we have created our flow we can test it out. To do this we will just return back to our PowerApp and register a new contact.


Then return to Flow and click on the i icon to the right of our new Flow to see the flow details.


This will show us all of the events that have been triggered and after a bit we should see that the flow has been successfully processed.


When we open up Dynamics we will see that the contact has been created for us.


And also a new lead has been created for us as well.


Review

With just a little bit of work we have been able to create a new mobile application that captures contact information within the Common Data Model and then created new records within Dynamics without writing a single line of code (functions don’t count).

How cool is that.

About the Author

Murray Fife is an Author of over 25 books on Microsoft Dynamics AX including the Bare Bones Configuration Guide series of over 15 books which step the user through the setup of initial Dynamics AX instance, then through the Financial modules and then through the configuration of the more specialized modules like production, service management, and project accounting. You can find all of his books on Amazon at http://www.amazon.com/author/murrayfife.

Murray is also the curator of the Dynamics AX Companions (www.dynamicsaxcompanions.com) site which he built from the ground up as a resource for all of the Dynamics AX community where you can find walkthroughs and blueprints that he created since first being introduced to the Dynamics AX product.

Throughout his 25+ years of experience in the software industry he has worked in many different roles during his career, including as a developer, an implementation consultant, a trainer and a demo guy within the partner channel which gives him a great understanding of the requirements for both customers and partner’s perspective.

For more information on Murray, here is his contact information:

Email:
mcf@dynamicsaxcompanions.com
Twitter: @murrayfife

Facebook: facebook.com/murraycfife
Google: google.com/+murrayfife
LinkedIn: linkedin.com/in/murrayfife

Blog: atinkerersnotebook.com

Docs: docs.com/mufife
Amazon: amazon.com/author/murrayfife

Collaboration workspaces for Projects are a great way to provide a central repository for all of your project documents that everyone (or at least everyone that you want to) can have access. This takes advantage of the SharePoint Sites that Dynamics is able to automatically create if you like.

But with Office 365, a new option is available to us, and that is the Office 365 Groups. Groups provide a couple of additional features that make it a better alternative to the SharePoint sites because it allows you to create your own personal group, with its own OneDrive for Business repository, Project OneNote Notebook, Project Calendar, Project Conversation board and much more.

Although Dynamics does not automatically create the group for us, that doesn’t mean that we can’t use this for our workspace though, all we need to do is link the group to our Project. This is a small tradeoff for what this give us in return.

How to do it…

To do this, all we need to do to start off with is to open up Office 365 and go into Outlook. We will see that all of our Groups are shown on the left hand side of the view.


Just click on the + button to create a new group.


Then give your new group a Name that has not been taken. A quick tip here is to prefix all of the project groups with Project to help make them unique.

After we have done that we can just click on the Create button.


After the group is created, we will also be asked to invite any project members that we may want to have access to the project right away. We can search through our company directory and find the common project members.


After we have selected all of our project members then we just click on the Add button to add them to the Group.


After doing that we will have a new Office Group that we can start using to track all of our documents.


After embellishing it a little bit we are ready to start taking advantage of the group for our project collaboration.

To do this we want to click on the View Group Files and Activity link.


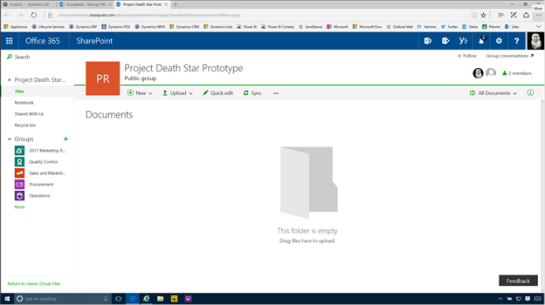
This will open up the document repository that is connected to the Group.


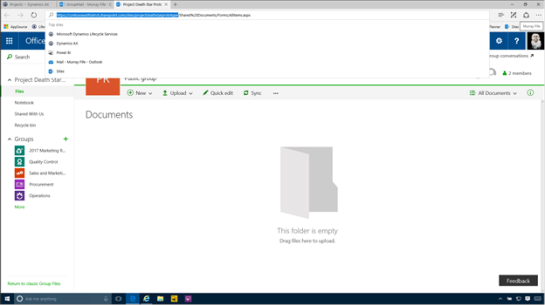
All we need to do is copy the base URL – everything up to the Shared Documents part of the URL.


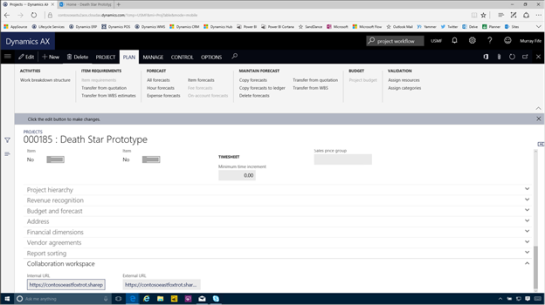
Now we will want to connect the Document workspace to the project. In order to do this we will want to open up the project and then click on the Collaboration Workspace link within the Project ribbon bar and then click on the Link collaboration workspace option.


This will open up a dialog panel for us where we can specify the Internal and External URL for the collaboration site. All we need to do here is paste in the URL’s and then click on the OK button.


When we return back to the project we will see that the URL’s now show up in the Collaboration Workspace fast tab.


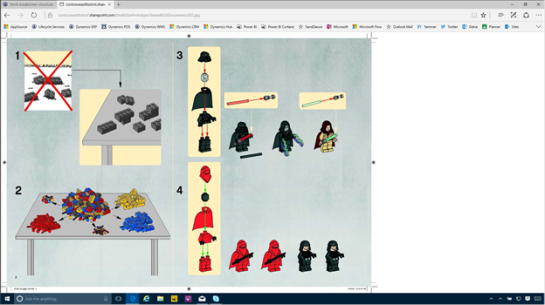
If we click on the link then we will be able to access all of the documents that have been filed away against the Office 365 Group.


As a bonus we have a OneNote Online notebook just for the Office Group.


And as a bonus bonus, we can create our own Planner task boards that are associated just with the Office 365 Group.


Review

How cool is that?

PS. This is a rhetorical question – Office Groups and Collaboration workspaces go together like Peanut Butter and Jelly.

About the Author

Murray Fife is an Author of over 25 books on Microsoft Dynamics AX including the Bare Bones Configuration Guide series of over 15 books which step the user through the setup of initial Dynamics AX instance, then through the Financial modules and then through the configuration of the more specialized modules like production, service management, and project accounting. You can find all of his books on Amazon at http://www.amazon.com/author/murrayfife.

Murray is also the curator of the Dynamics AX Companions (www.dynamicsaxcompanions.com) site which he built from the ground up as a resource for all of the Dynamics AX community where you can find walkthroughs and blueprints that he created since first being introduced to the Dynamics AX product.

Throughout his 25+ years of experience in the software industry he has worked in many different roles during his career, including as a developer, an implementation consultant, a trainer and a demo guy within the partner channel which gives him a great understanding of the requirements for both customers and partner’s perspective.

For more information on Murray, here is his contact information:

Email: mcf@dynamicsaxcompanions.com
Twitter: @murrayfife

Facebook: facebook.com/murraycfife
Google: google.com/+murrayfife
LinkedIn: linkedin.com/in/murrayfife

Blog: atinkerersnotebook.com

Docs: docs.com/mufife
Amazon: amazon.com/author/murrayfife


Dynamics ERP is great by itself as a transactional system, but when you incorporate all of the other services that are available through Office 365, it becomes even more powerful.

In this worked example we will show a quick scenario to illustrate this where the users can collaborate using these tools, and show how a Project Administrator is able to quickly find out information about a questionable project that just landed within their workspace.

How it works…

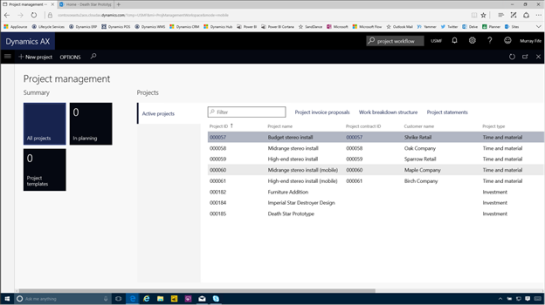
The project administrator logs into their Project Management workspace to review all of the active projects and notices a new project that has been added that piques their interest.


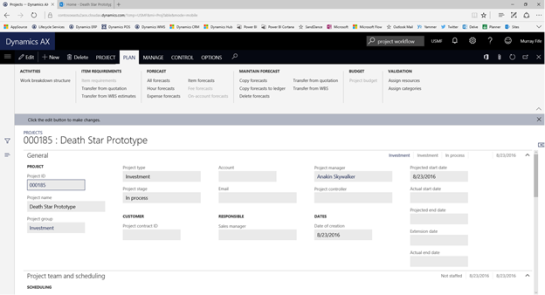
They open up the project details to find out a little more information on the project.


Drilling into the Project Work Breakdown Structure, they have a couple of concerns regarding the project plan.


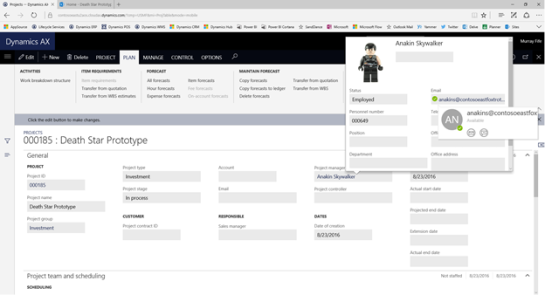
They return back to the project and see that a Project Manager has been assigned, and they open up the contact card and see that the Project Manager is online via Skype through the Presence indicator.


The project administrator starts a Skype conversation with the Project Manager.


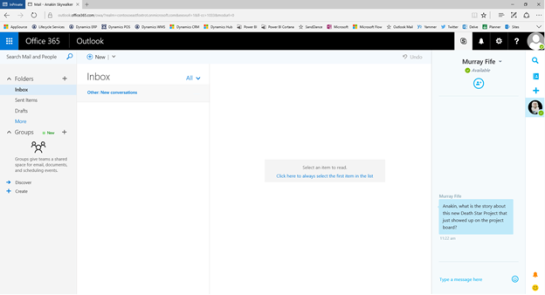
The Project Manager is currently online within Office 365 and gets a notification that the Project Administrator is wanting to talk to them, and accepts the conversation.


Through Office 365 they are able to use Skype online without having to open up a Skype client.


The Project Manager drops the Project Administrator a quick note describing the project objectives and the status of the project.


The Project Administrator confirms that the project is a go through Skype.


The Project Manager adds a quick note to tell the Project Administrator that there are also more details on the project within the SharePoint Collaboration Workspace where they are storing more information about the project.


The Project Administrator clicks on the Collaboration Workspace link within the Project details.


They open up the Project Collaboration workspace and see that there are some additional documents that have been saved away within SharePoint.


This allows them to see more information about the project.

Everything looks pretty well planned out.


Review

How cool is that.

More Information

If you want to see the scenario, I posted it here on docs: https://doc.co/tvw8jv

About the Author

Murray Fife is an Author of over 25 books on Microsoft Dynamics AX including the Bare Bones Configuration Guide series of over 15 books which step the user through the setup of initial Dynamics AX instance, then through the Financial modules and then through the configuration of the more specialized modules like production, service management, and project accounting. You can find all of his books on Amazon at http://www.amazon.com/author/murrayfife.

Murray is also the curator of the Dynamics AX Companions (www.dynamicsaxcompanions.com) site which he built from the ground up as a resource for all of the Dynamics AX community where you can find walkthroughs and blueprints that he created since first being introduced to the Dynamics AX product.

Throughout his 25+ years of experience in the software industry he has worked in many different roles during his career, including as a developer, an implementation consultant, a trainer and a demo guy within the partner channel which gives him a great understanding of the requirements for both customers and partner’s perspective.

For more information on Murray, here is his contact information:

Email: mcf@dynamicsaxcompanions.com
Twitter: @murrayfife

Facebook: facebook.com/murraycfife
Google: google.com/+murrayfife
LinkedIn: linkedin.com/in/murrayfife

Blog: http://www.atinkerersnotebook.com

Docs: docs.com/mufife
Amazon: amazon.com/author/murrayfife

Dynamics AX 2012 allowed us to create Partitions which were great for demonstrations and training because they allowed you to create new Dynamics AX instances within the same database.

The business data in each partition is isolated from the data in all other partitions in the same installation of Microsoft Dynamics AX.

Business data that is shared among companies is shared only among companies that are in the same partition.

Each Microsoft Dynamics AX client session starts in a partition. The session cannot later be switched to another partition. Instead the user must start a new session and direct it to start in a different partition, if the user is authorized for another partition. The system prevents even the system administrator from accessing data in any partition other than the current partition of the session.

But with the release of Dynamics AX online, the partition function is conspicuously absent from all of the System Administration menu.

This would make you think that the Partitions functionality is no longer available or supported.

This is partly correct. The partition functionality is still available, just not supported any more by development or R&D. A number of important features do not recognize non-primary partitions. Data entities, MR reports and attachments to name a few.

That doesn’t mean that we can’t take advantage of Partitions within non-production environments and create training environments and test cases. Also if you want to create new companies from scratch, then this is a great way to do this without having to fire up a new Dynamics AX instance and pay for all of the hosting charges.

Accessing the Partition Administration Form

The first thing that we will want to look at is how we can access the Partition Administration form which will show us all of the Partitions that we have configured within our environment and also allow us to create new partitions.

Even though the menu item is not available within the System Administration menu, that doesn’t mean that it’s gone for good. The menu item is still available, and if we want to hack the Dynamics AX URL then we can pull up the form.

But what is even more interesting is that even though the menu item is not there, you can still get to the Partition Administration form through a URL hack.

All we have to do is update our URL and add the following qualifier to it to tell it to open the PartitionAdministration menu item:

mi=partitionadministration

The full URL will look something like this:

https://yourservername.cloudax.dynamics.com/?cmp=USMF&mi=partitionadministration

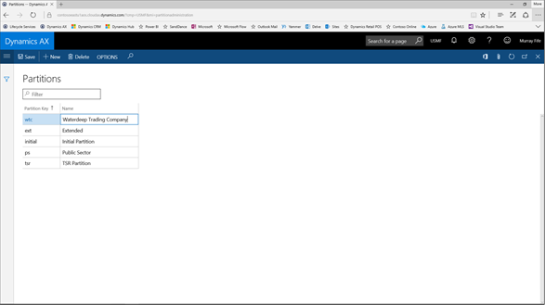
When the page refreshes we will be taken to the Partition Administration form and we will see that in addition to the initial partition, there are a couple more that are waiting to be accessed.


Switching between Partitions

Now that we know what partitions are available, we can switch between them.

To do this we just need to add a new partition qualifier to the end of our Dynamics AX URL to specify the alternate partition that we want to use.

Here is the secret code that we would add:

&prt={partition}

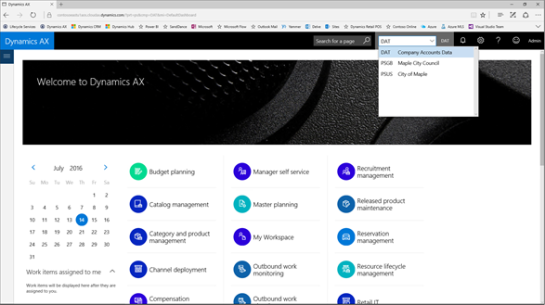
For example, if we wanted to switch to the Public Sector partition within the demonstration database then the URL would look something like this:

https://yourservername.cloudax.dynamics.com/?prt=ps&mi=DefaultDashboard&cmp=DAT

When Dynamics AX refreshes we will see that our companies have changed to the Public Sector organizations.

And also all of the demo data is now Public Sector data.


Creating a new Partition

Taking advantage of the standard demonstration partitions is pretty neat, but the major benefit that we can get from the Partition functionality is that we can actually create our own new partitions that could be used for training or for testing setups.

To do this all we need to do is return to the Partition Administration form and then click on the New button in the menu bar.


Then we can enter in a new Partition Key and a Description and then click on the Save button in the menu bar.


Now that we have created our new Partition key we can hack the URL and specify our new Partition by adding the &prt= qualifier to Dynamics AX URL


When Dynamics AX refreshes we will be in our new Partition and we will see that it just has the DAT company.


Also, if we look at the users in the new Partition we will see that the Admin user has been set up already.

All we need to do now is start building our data.


Summary

Although this is not an officially supported feature within Dynamics AX, it is still there for us to take advantage of. Just be warned that not everything will work when it comes to integrating some of the more advanced features, but it is good to know that it is there.

About the Author
Murray Fife is an Author of over 25 books on Microsoft Dynamics AX including the Bare Bones Configuration Guide series of over 15 books which step the user through the setup of initial Dynamics AX instance, then through the Financial modules and then through the configuration of the more specialized modules like production, service management, and project accounting. You can find all of his books on Amazon at http://www.amazon.com/author/murrayfife.

Murray is also the curator of the Dynamics AX Companions (www.dynamicsaxcompanions.com) site which he built from the ground up as a resource for all of the Dynamics AX community where you can find walkthroughs and blueprints that he created since first being introduced to the Dynamics AX product.

For more information on Murray, here is his contact information:

Email: mcf@blindsquirrelpublishing.com
Twitter: @murrayfife

Facebook: facebook.com/murraycfife
Google: google.com/+murrayfife
LinkedIn: linkedin.com/in/murrayfife

Blog: atinkerersnotebook.com

Docs: docs.com/mufife
Amazon: amazon.com/author/murrayfife

To showcase Dynamics AX’s full potential within presentations, you really want to work with multiple personas with different job roles. This highlights the different access that all of the different people have, it cuts down on the number of functions that users are allowed to access, and also it just looks nice to change the view of the Dynamics AX world every now and then.

The problem though is how do you log into multiple personas at once. All of the session information is held in the browser cookies, so you probably start up In Private sessions, or open up other browsers that don’t share the session information. Even then you are still limited to the number of sessions that you can open and also having multiple browsers open like IE, Safari, Chrome etc. although it shows the compatibility of Dynamics AX with the different browsers, looks a little cluttered.

If only there was a better way.

Don’t fret. There is a better way, and it’s pretty simple to do. All you need to do is use the New Session function in Internet Explorer.

How to do it…

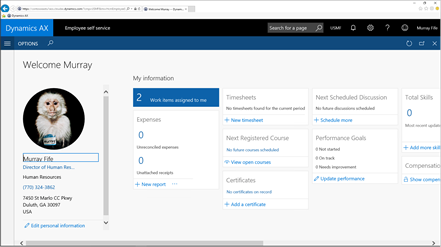
Step 1: Open up your first Persona

Start off by opening up your first Persona in Internet Explorer. Don’t do this in Edge because the feature is not available in that browser.


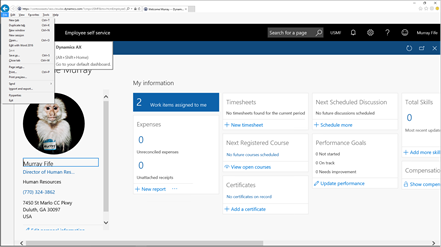
Step 2: Click on the New Session menu item

Now open up the File menu (ALT+F) and select the New Session menu item.


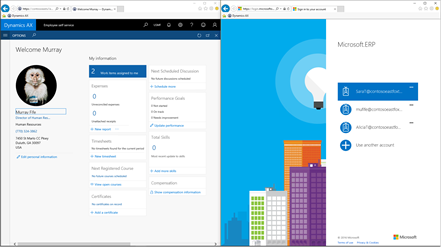
Step 3: Log in as your new Persona

This will open up a new Internet Explorer browser but the interesting thing is that the session will not share any of the information with the other browser window so you will be able to log in as another persona with different credentials.


How it works…

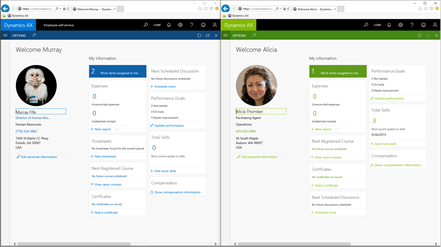
Step 4: Two separate Personas

When the second browser logs into Dynamics AX, you will see that the session is running as the new persona and you can now swap between the different users without a problem.


Step 5: You don’t have to stop there

You don’t have to stop there; you can create as many different sessions that are logged into Dynamics AX with their own separate sessions.

As a side note, you can also take advantage of the different color options within the users’ preferences to make it easier to see which user you are logged in as.


Summary

Logging in as different users has a whole slew of benefits. It allows you to work as a user other than the system administrator who has global access, and show what the real users would see and it allows you to show the interaction between the users through workflow and collaboration.

Also, by staging the sessions so that you don’t have to sign out and back in to show the different users makes the process seamless, and also makes the presentation a lot simpler.

About the Author

Murray Fife is an Author of over 25 books on Microsoft Dynamics AX including the Bare Bones Configuration Guide series of over 15 books which step the user through the setup of initial Dynamics AX instance, then through the Financial modules and then through the configuration of the more specialized modules like production, service management, and project accounting. You can find all of his books on Amazon here http://www.amazon.com/author/murrayfife.

Murray is also the curator of the Dynamics AX Companions (www.dynamicsaxcompanions.com) site which he built from the ground up as a resource for all of the Dynamics AX community where you can find walkthroughs and blueprints that he created since first being introduced to the Dynamics AX product.

For more information on Murray, here is his contact information:

Email: mcf@dynamicsaxcompanions.com

Twitter: @murrayfife
Facebook: facebook.com/murraycfife
Google: google.com/+murrayfife
LinkedIn: linkedin.com/in/murrayfife

Blog: http://www.atinkerersnotebook.com

Docs: docs.com/mufife
Amazon: amazon.com/author/murrayfife

With Update 1 of Dynamics AX, a new feature was added that allows you to use Microsoft Exchange Server as the e-mail provider for both workflows and also for sending e-mails directly from Dynamics AX. Previously the email transport options were SMTP and the client applications.

This is an important feature because it means that the outgoing emails are tracked within Exchange and stored as sent mail just in case you need to go back and reference them later on. With SMTP, you have no record of the sent e-mail unless you CC yourself. And if you use the client method to create your emails, then you can’t send the emails unless you have Outlook open, which is a little inconvenient.

Getting ready…

Step 1: Configure the Microsoft Exchange Server Parameters

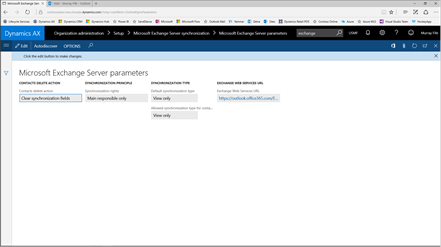
To get this configured within Dynamics AX, first start by making sure that the Microsoft Exchange Server parameters are configured to point to your Exchange server.


Step 2: Use Autodiscovery to set the Microsoft Exchange Settings

If they are not configured, then just click on the Autodiscover button in the menu bar and then type in your Email and Password and then Dynamics AX will discover where the Exchange server is for itself.


Step 3: Set the default Email Provider to Exchange

Then within the user Options,
browse to the Account page and click on the Email Provider ID and you will be able to select the Exchange option, which will tell the system to send all of your emails through Microsoft Exchange Server.


How it works…

Step 4: Create a Statement to Contact through Customer Collections

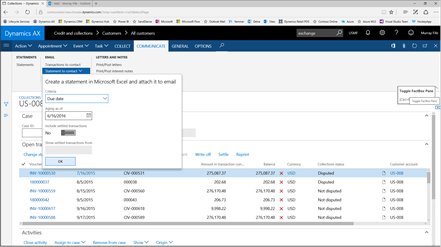
To see this in action, open up a customer and navigate to the Collections form with all of the transactions and history for the customer account.

Then click on the Statement to customer button within the action panel to create a new Statement, and then click on the OK button.


Step 5: Personalize the email

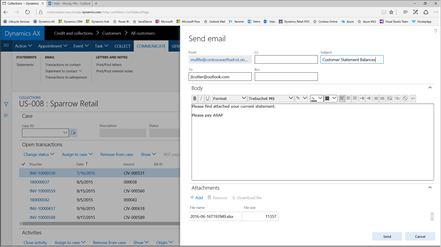
This will automatically create the statement for us ax an Excel file (you can see it at the bottom of the Send Email panel that pops up) and also allow you to personalize the email that you are going to send to the customer.

After updating the Subject and also adding a personal message in the email body, we just need to click on the Send button.


Step 6: Email archived within Exchange

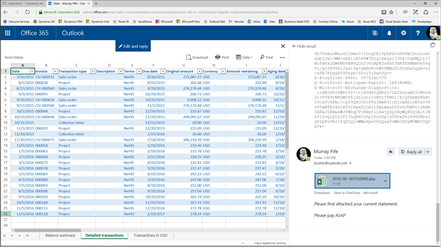
Now if we switch over to our Exchange account we will see that the email that we just created is sitting in our Sent email box.


Step 7: The Statement is an Attachment

Also from here we can see that the Statement is attached to the email as well and if we need to peek inside and see what Dynamics AX created for us then we can.


Step 8: There are multiple tabs on the Statement

The statements aren’t just single worksheets as well; they have multiple pages within the workbook which is pretty cool as well.


Summary

If you are wanting to audit emails, or archive correspondence that is sent out to the customer (and vendors etc.) then this is a great way to do it. Also this is a much better option than SMTP or using the client because it is completely hands off and integrated into Dynamics AX.

If you ask me, this is the only way that we should be sending emails.

About the Author

Murray Fife is an Author of over 25 books on Microsoft Dynamics AX including the Bare Bones Configuration Guide series of over 15 books which step the user through the setup of initial Dynamics AX instance, then through the Financial modules and then through the configuration of the more specialized modules like production, service management, and project accounting. You can find all of his books on Amazon here http://www.amazon.com/author/murrayfife.

Murray is also the curator of the Dynamics AX Companions (www.dynamicsaxcompanions.com) site which he built from the ground up as a resource for all of the Dynamics AX community where you can find walkthroughs and blueprints that he created since first being introduced to the Dynamics AX product.

For more information on Murray, here is his contact information:

Email: mcf@dynamicsaxcompanions.com

Twitter: @murrayfife
Facebook: facebook.com/murraycfife
Google: google.com/+murrayfife
LinkedIn: linkedin.com/in/murrayfife

Blog: http://www.atinkerersnotebook.com

Docs: docs.com/mufife
Amazon: amazon.com/author/murrayfife

Dynamics AX allows us to Save document attachments in a number of different locations including within SharePoint. This is a great option because not only do you have a way now to index and manage the documents, but also the documents are also indexed and made available to users through other Office 365 tools like Delve. This provides an enterprise indexing and search option which is extremely helpful, without adding any additional work for the administrators.

Getting ready…

Step 1: Create a Document Type linked to SharePoint

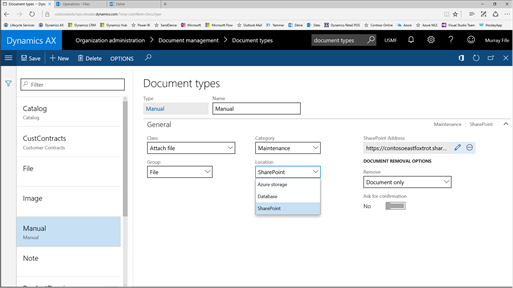
To start off, create a new Document Type within Dynamics AX, and make sure that you set the Location to SharePoint. This will enable the SharePoint Address field and you can click on the pencil icon to the right of the field.


Step 2: Select the SharePoint Document Library

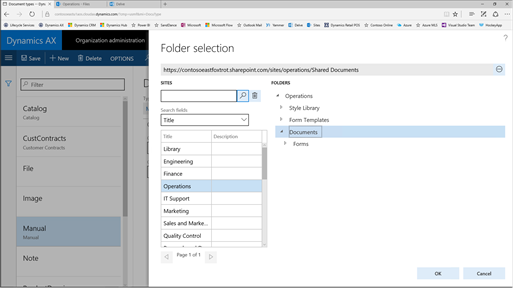
This will allow you to navigate through all of your sites that you have configured within SharePoint and select the default document library that you want to save the document into.

In this example we have created a number of sites, and these are just Office Groups that we created within SharePoint.


How to do it…

Step 3: Open a new Released Product

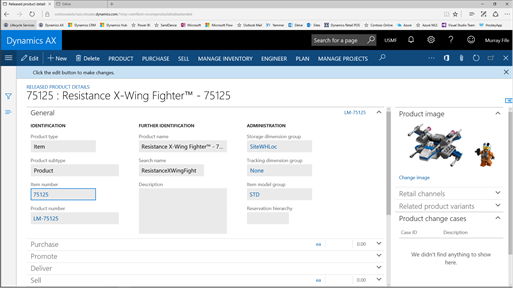
Now that we have the document types linked to SharePoint we can start saving documents away there. To do this start by opening up a Released Product and then click on the Document Attachment icon (the paper clip) in the top right hand corner of the form.


Step 4: Attach a document within SharePoint

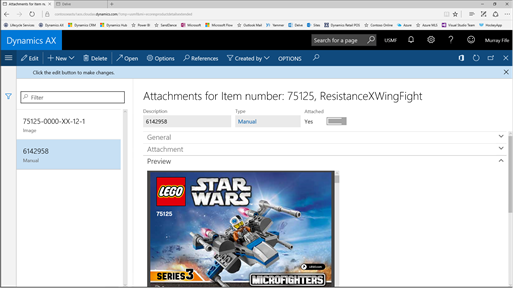
When the Document Attachment window is displayed, attach a file to the record using the SharePoint enabled Document Type that you just created.


How it works…

Step 5: Document saved to SharePoint

Now the document will be saved within SharePoint within the library that you assigned to the Document Type.


Step 6: Document becomes visible within Delve

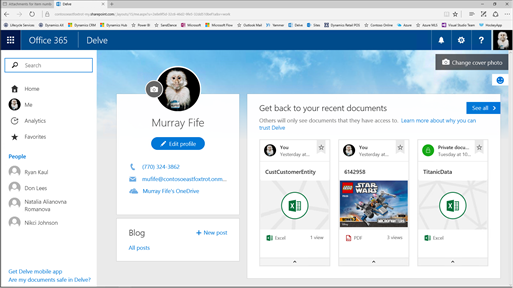
But there is more. Since the Document has been saved within SharePoint then it will start to be surfaced within Delve as a document that the user created.


Step 7: Open Delve as another user

This becomes even more useful because the document is now searchable through Delve by other users (that have access) to the SharePoint library that you stored the document within.

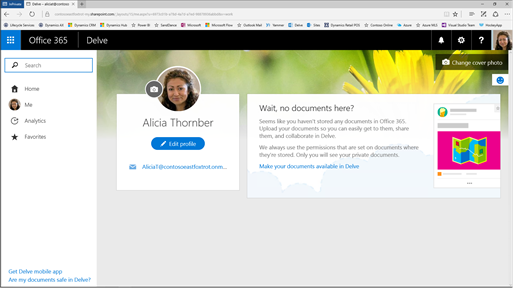
For example, here we will sign into Delve as Alicia.


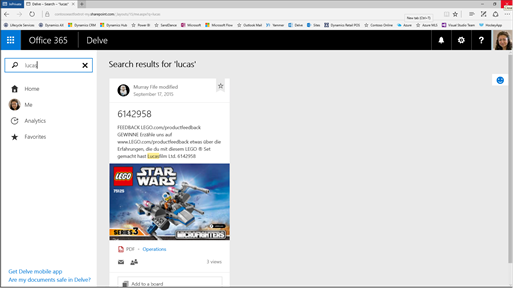
Step 8: Document found based on key words

If Alicia searches for any document that has a particular keyword that matches the document, or the indexed contents of the document then she will be able to find the file that we just saved from within Dynamics AX.

More importantly, since we saved a PDF file, Delve will search through the contents of the document as well and allow us to do a full text search within the file.


Summary

By saving Dynamics AX attachments within SharePoint, all of the documents become a resource for the entire organizations. Performing an Enterprise Search using keywords and time frames becomes enabled through not only SharePoint but also through Delve. Along the way these documents can then be Shared with non-Dynamics AX users (that have permission of course) and also we can use Office 365 as a document management system, rather than locking up all of the documents within the database and using up valuable space within SQL.

About the Author

Murray Fife is an Author of over 25 books on Microsoft Dynamics AX including the Bare Bones Configuration Guide series of over 15 books which step the user through the setup of initial Dynamics AX instance, then through the Financial modules and then through the configuration of the more specialized modules like production, service management, and project accounting. You can find all of his books on Amazon here http://www.amazon.com/author/murrayfife.

Murray is also the curator of the Dynamics AX Companions (www.dynamicsaxcompanions.com) site which he built from the ground up as a resource for all of the Dynamics AX community where you can find walkthroughs and blueprints that he created since first being introduced to the Dynamics AX product.

For more information on Murray, here is his contact information:

Email: mcf@dynamicsaxcompanions.com

Twitter: @murrayfife
Facebook: facebook.com/murraycfife
Google: google.com/+murrayfife
LinkedIn: linkedin.com/in/murrayfife

Blog: http://www.atinkerersnotebook.com

Docs: docs.com/mufife
Amazon: amazon.com/author/murrayfife